8 IKEA Paludarium Builds — Cabinets, Cases and What Holds Water

Most IKEA paludarium builds succeed or fail on one question: what actually holds water safely, and for how long. Once you separate display shell from waterproof vessel, the options line up clearly and you can choose the cabinet or case that fits your space without guessing. By the end, you will be able to specify a waterproof container, a support cabinet, lighting and ventilation, and the flow to keep both land and water sections healthy. I ran two enclosed builds side by side for 6 weeks to compare humidity retention and drip control in the “air” zone above the water. These eight approaches cover weight, sealing, ventilation, and the limits you cannot bend.
1. The Glass Box Inside the Furniture: Water Lives in the Tank, Not the Case

Glass holds water because silicone bonds the panes edge-to-edge, creating a continuous, elastically sealed vessel; flat-pack furniture joins with dowels and cams that are not watertight and will swell when the fiberboard core wicks moisture. That’s why the safe IKEA paludarium puts a standard rimmed or rimless aquarium inside the furniture and treats the furniture as a shroud, not a sump. Choose a glass aquarium sized so its bottom perimeter sits fully on solid support: allow 10 lb per gallon filled and leave 0.5 to 1.0 inch of air gap to the case walls for airflow. The limit is depth: if the furniture cannot hide the rim height plus 2 inches of light clearance, the look will fight you or cook your plants.
2. The Cabinet That Survives Humidity: Load Paths and Real Weight

Weight travels through vertical members into the floor; MDF and honeycomb tops without internal rails sag under sustained load because moisture lowers their modulus and the fasteners loosen. A cabinet with continuous side panels and a full back forms a box beam that resists racking, which is what saves the door gaps when a 30 to 60 gallon glass box sits inside for years. Aim for continuous side panels at least 0.6 inch thick, a full back panel, and four point loads aligned under the tank corners; keep total filled weight under 600 lb unless the cabinet has a central vertical divider. The failure mode here is creep: a top that deflects more than 1/16 inch over 36 inches in the first month will keep moving, and you will start chasing door alignment and glass stress.
3. The Pax-Style Tall Paludarium: Stack Height, Anchor, and Vapor Management

Tall wardrobes tempt because they frame a dramatic emergent zone, but a tall void creates warm, moist air that condenses on the coldest surface and runs where gravity takes it. The fix is controlling both heat and vapor: reduce temperature gradients and give condensate a planned path home. Place the aquarium on a dedicated shelf with at least 3 inches to the wardrobe sides for cable/airflow, anchor the cabinet to studs with two metal brackets into wood or masonry, and install passive vents near the top and bottom totaling 20–30 square inches. Without vents and an angled drip rail above the doors, you will get door-edge swelling within one heating season, even if no free water ever touches the wood.
4. The Greenhouse Lid: Condensation Management Above the Waterline

Warm saturated air holds water until it meets a cooler surface; at the dew point it releases condensate, which drops onto electronics, soil, and edges. Sloped glazing returns that water to the tank instead. Build a lid with two glass or polycarbonate panels meeting at a ridge, each sloping 5–10° back toward the water and leaving a 0.25–0.5 inch rear gap for cables and gas exchange. Polycarbonate is lighter and insulates better than glass but scratches; glass stays clear longer and resists bowing up to 36 inches if supported at the edges. The limit is sealing it completely: a 100% tight lid plus warm lights will push humidity to 95–100% and promote mold on emergent stems and wood.
5. The Water Basin Choice: Glass, Acrylic or Tray — What Actually Holds Water

Hydrostatic pressure scales with depth, not footprint, so even a shallow basin pushes steadily on seams; wood coatings are diffusion barriers at best and fail at screw holes and edges. That’s why the water belongs in a purpose-built vessel: glass, acrylic, or a continuous-mold tray. For small floor ponds under furniture, a polypropylene or ABS tray at least 0.12 inch thick with a single-piece rim is safer than painted wood; for display, a standard glass aquarium with 6–10 mm glass depending on length carries the load predictably. Acrylic saves weight and takes drilling well but needs full-bottom support to avoid crazing; the honest limit of trays is scratchy optics and tall walls that bow if you fill deeper than 8–10 inches.
6. The Flow Loop: Circulation for Both Waterfall and Roots

Waterfalls gas off CO2 and pull evaporative cooling through the paludarium airspace, while submerged flow keeps substrates oxygenated and returns filtrate to the display. If the pump is too small, you get stagnant pockets in the lower pool and slime on the splash zone; too large and you atomize water into the cabinet. Size a submersible pump to 4–8× the water volume per hour after head loss, and spread return flow across the land shelf using a perforated manifold with 1/8 inch holes every 1–2 inches. Add a coarse prefilter sponge and clean it weekly; without that, leaf litter will choke the intake and your waterfall will taper in two days. Keep splash contained—distance water exits at least 2 inches from any wood edge.
7. Lighting in a Box: PAR, Heat, and Distance to Leaves

LEDs emit photons and heat; in a closed furniture volume both collect near the fixture, raising leaf temperature and driving more transpiration than roots can supply in saturated air. Plants need usable light (PAR), not watts, so you size to the target intensity at the highest leaves and control throw and heat with distance and ventilation. For low-to-moderate emergent growth, target 60–150 µmol/m²/s at the canopy with lights hung 8–14 inches above the top leaves; provide 1–2 air changes per minute through the case via quiet fans drawing 1–3 watts. If you press the lights to the lid to hide them, hotspots form and you’ll see leaf-edge burn even at modest PAR because the leaf surface runs hotter than ambient by 3–6°F.
8. Humidity, Evaporation, and the “Soggy Cabinet” Problem
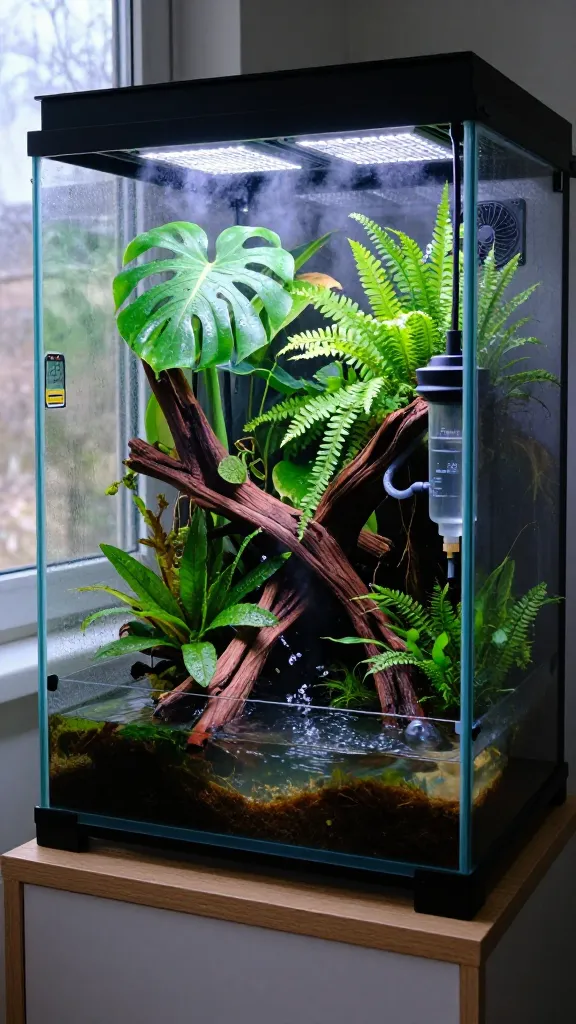
Evaporation cools the water and raises relative humidity in the confined airspace; when that moist air finds cold furniture panels, water diffuses into the fiber core and swells it. Control comes from balancing evaporation and ventilation: enough exchange to keep RH at 75–90% for most terrestrial aroids and ferns, but not so much that you burn through more than 1–2% of water volume per day in winter. Use a digital hygrometer at leaf height and an auto top-off reservoir equal to 7–10 days of evaporation, plus a drip edge around the basin that returns errant water to the tank. My one firm opinion: sealing every interior furniture surface with multiple coats of a film finish is worth the weekend; bare or single-coated fiberboard will telegraph swell at door bottoms within one heating cycle.
Frequently Asked Questions
How much weight can an IKEA cabinet safely hold for a paludarium?
Calculate your setup at roughly 10 lb per gallon and ensure those loads sit directly over vertical supports, not a floating top. The load must pass through side panels or internal dividers into the floor, with a full back to resist racking. If your filled weight exceeds 600 lb, add a central support and wall anchors into studs.
Can I use silicone to seal an IKEA case and make it a paludarium tank?
No—furniture panels are not structural aquarium walls, and silicone does not bond long-term to melamine or painted fiberboard under hydrostatic load. Use a real glass or acrylic aquarium or a molded tray to hold water, and let the cabinet be the enclosure and support. Relying on seam caulk will fail at edges and screw holes within months.
What lighting PAR should I aim for in an IKEA paludarium?
For emergent aroids, mosses, and ferns, aim for 60–150 µmol/m²/s at the top leaves with lights 8–14 inches above the canopy. Measure with a PAR meter or a calibrated app and adjust distance to control heat and spread. Ventilate the case to keep leaf surface temperatures within 3–6°F of room air.
How much flow do I need for the water section and waterfall?
Target a pump that delivers 4–8× the actual water volume per hour after head loss, then diffuse it through a spray bar or manifold. This keeps submerged zones oxygenated and spreads moisture evenly across the land shelf without misting the cabinet. If splash reaches wood, reduce nozzle velocity or increase return distance to edges to at least 2 inches.
What’s the best cabinet ventilation for a paludarium build?
Provide passive vents top and bottom totaling 20–30 square inches, or run quiet fans to achieve 1–2 air changes per minute inside the enclosure. This prevents condensation at cold spots and keeps relative humidity in the 75–90% range where most paludarium plants thrive. Without it, you’ll see door-edge swelling and mold growth within weeks.
Measure First, Then Commit Screws
The governing principle is simple: water belongs in a vessel built to hold it, and that vessel needs continuous support under a cabinet that can carry the weight for years. Tonight, set a level and a tape on the intended shelf—confirm zero bow under body weight, find two studs for anchors, and mark a 0.5 inch airflow gap around your tank footprint before you buy anything.
Questions about your own setup? Leave them in the comments and I will work through them. — Nate